Assistance for eliminating Ads by Media Buzz from infected PC:
If you are installing “Media Buzz” into your browsers by believing on its claims then you are wrong. It claims to provide users enhance Internet browsing experience by displaying Website content and advertisements related to users browsing history and interests. While this feature may seems legitimate and attractive cyber researchers or security analyst classified Ads by Media Buzz into adware or Potentially Unwanted Program. You also have to know that many reputable anti-virus detected Ads by Media Buzz as a Trojan malware which capable to steal users data. It claims web surfer to enhance their browsing experience and deliver several beneficial features. Only few of the System users know that not all programs are useful at all. Some of them are designed by hackers with wrong intention and among all of them, Ads by Media Buzz is one of the most suspicious and unwanted program listed by security analysts
Spreading Channels Of Ads by Media Buzz:
Being a dreadful adware program, Ads by Media Buzz utilizes different strategies to contaminate Windows PC. Yet, among all the most widely recognized and popular appropriation channel is packaging technique. At the point when System clients download and without cost application or shareware bundles utilizing default establishment choice, it naturally gets inside the PC. Along these lines, it is proposed by experts that Windows users must be mindful while performing out the download and installing technique. Another sources of its invasion are spam messages, downpour downloads, pilfered programming, hacked destinations, web based diversions etc.
Harmful Effects Of Ads by Media Buzz
Doesn’t matter how Ads by Media Buzz proliferates inside the machine. Once it enters into machine successfully, it will causes several serious issues which as a result you have to face with various troubles. Some of the common issues made by Ads by Media Buzz are as follows :
- Make several unwanted modifications to browser settings.
- Causes web redirection issue by redirecting web searches result on malicious sites.
- Displays several unwanted and annoying ads on users screen.
- Steals users all personal details and share them with remote attackers.
- Opens backdoor and bring several hazardous threats etc.
It brings in numerous other treacherous infections inside system without the user’s awareness via very silently degrading the working efficiency of the anti-malware program existing in it. Hence, regarding an effortless web surfing experience, undoubtedly an immediate removal of Ads by Media Buzz is needed.
«Click Now to get rid of Ads by Media Buzz»
Note: – Ads by Media Buzz is really very technical issue which is far from normal users thought. If you are annoyed and irritated from its malevolent activity and annoyance then here is the help. Below, we provide complete solution for Ads by Media Buzz evacuation from your infected System. Read it carefully and use the guide to secure PC from unwanted threats like Ads by Media Buzz.
For eliminating Ads by Media Buzz from your infected System there are 2 Possible methods:
Using Automatic Removal tool [Anti-Malware] (very easy and complete solution with time saving)
By Manual Process (very technical and risky suggested for IT users/eats too much time)
Best and easy trick to remove Ads by Media Buzz (Using Automatic Removal tool)
Ads by Media Buzz is created by very smart programmers (Black-hat hackers) who uses very tricky codes that is very hard to remove manually from System. Therefore, group of White-hat hackers creates Anti-malware software to fight against evil act of Black-hat hackers. An automatic removal tool is best for removing Ads by Media Buzz from infected System as it makes full scan of your System in few minutes and finds every issue created inside Computer. But, if you opt to use manual removal process there is many chances that you can’t search every folder and Ads by Media Buzz keeps remain inside PC. That’s why, Automatic removal tool is best option to eliminate any threat from PC and it will also protect your identity and PC in future. Well using trial version of an anti-malware to Scan PC doesn’t cost you any penny then why not use it. Download anti-malware now and Scan the whole PC to eliminate Ads by Media Buzz.
Guide to Use Automatic removal tool for uninstalling Ads by Media Buzz:
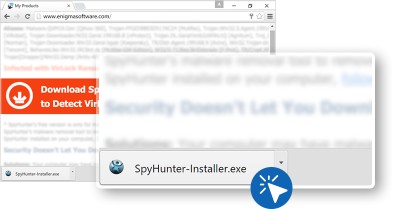
First of all click below to download anti-malware tool.

After the download completed make double click on downloaded “.exe” file
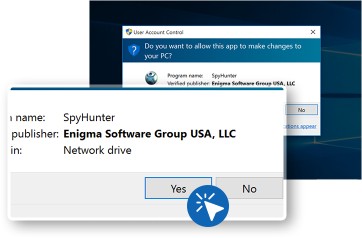
There is less chances that “Administrator” permission required, if pop-ups comes then click on “Yes”
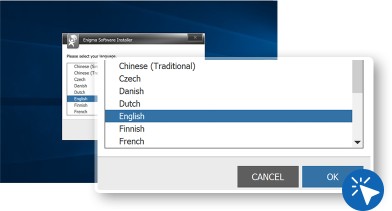
Select your best language to understand anti-malware easily
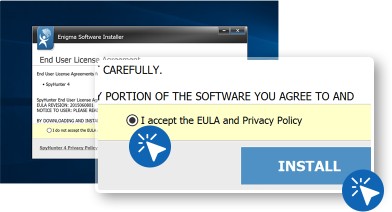
After this click on “Continue” and then accept the “End User License Agreements”. click “Install” button.
- Now your anti-malware tool is ready to proceed.
- Make a double click on the shortcut icon of “SpyHunter 4” anti-malware from desktop to remove Ads by Media Buzz
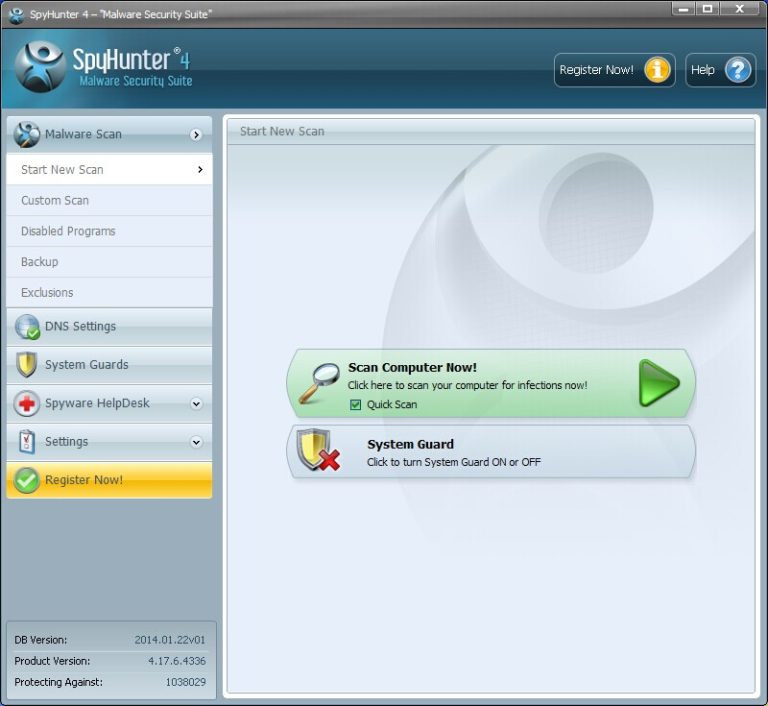
When anti-malware is open it provides you different options, and first thing you have to do is click on “Start New Scan”:
After that “SpyHunter 4” will start scanning your System for Ads by Media Buzz threat.
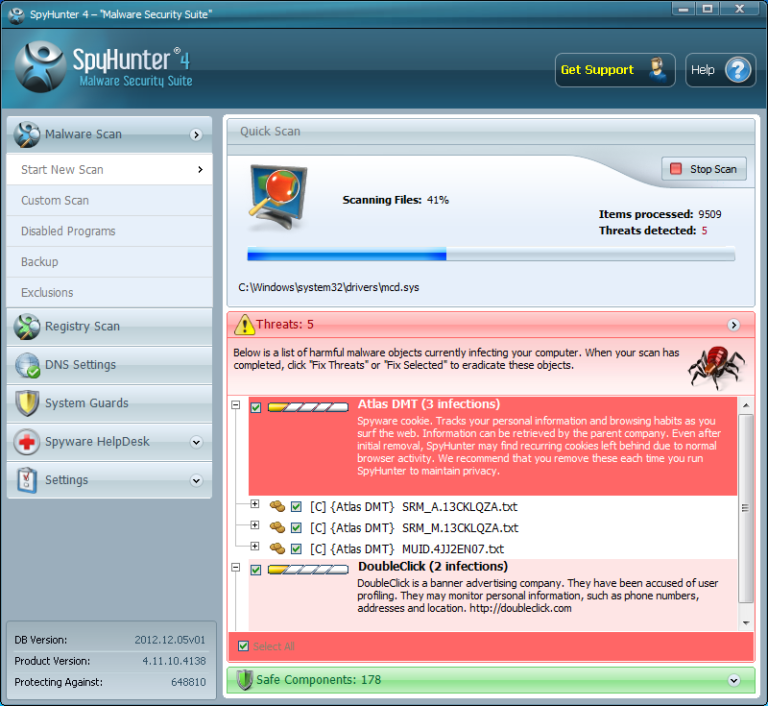
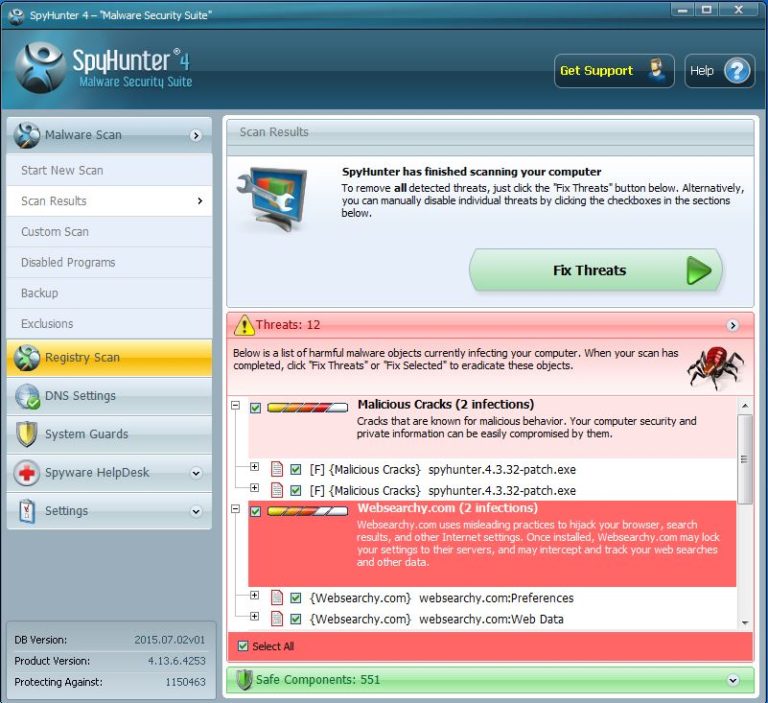
After a complete Scan it will give you result details then you have to click on “Fix Threats” to remove Ads by Media Buzz and all viruses available on the PC.
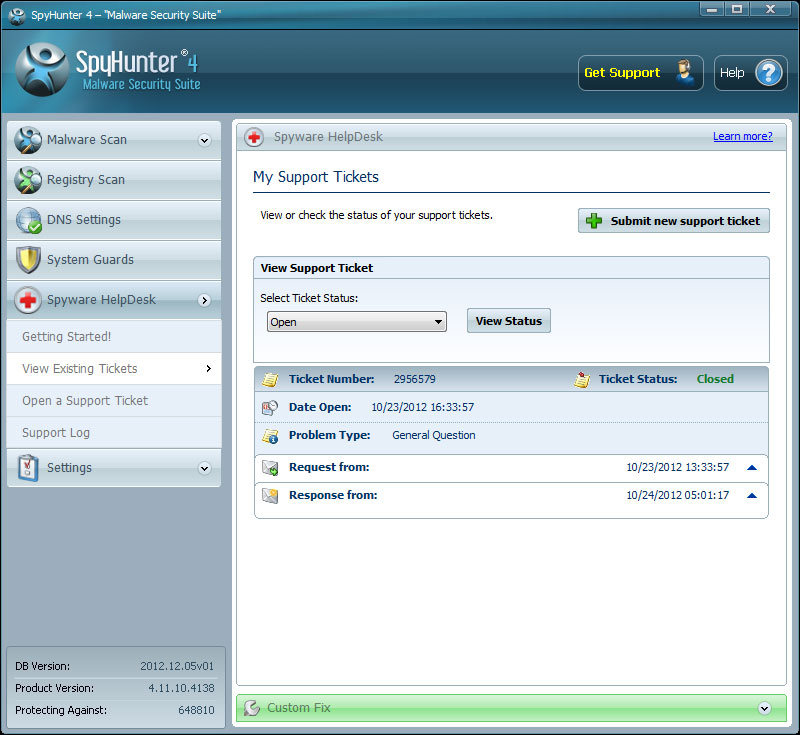
If you are still getting errors in eliminating Ads by Media Buzz or other malware threats then don’t be panic, SpyHunter 4 gives you “SpyWare HelpDesk” from where technical support service will help you regarding your issues.
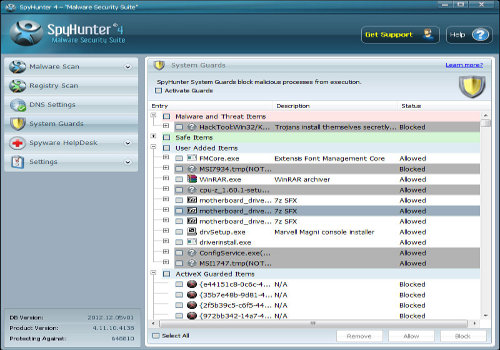
SpyHunter 4 comes with inbuilt Firewall name as “System Guard” which protect your System from upcoming dangers.
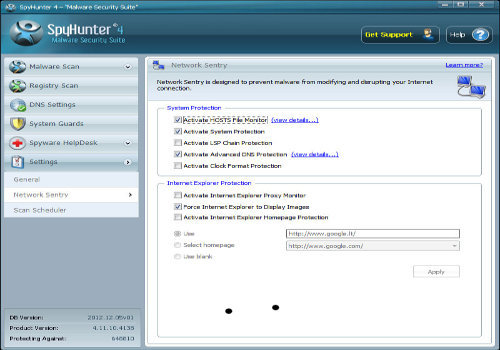
In research cyber security experts founded that all virus attacks on Computer network. Therefore, SpyHunter 4 comes with inbuilt “Network sentry” which protects your all network connection.
There is also a Option “Scan schedule” which scan your Computer by the time you set. It helps you to regular scan your PC for infected files or programs that came through vicious ways.

Long and technical procedure to remove Ads by Media Buzz (Manual tutorial for Ads by Media Buzz elimination):
Black-hat hackers are very clever programmers, they create their program in such manner from which their program easily hide into your System. Ads by Media Buzz can be removed from your System manually if you have Well-defined Computer knowledge. For applying “Manual Removal” procedure users/victims must have to knowledge of Networking, Computer application, Registries, DNS section and they also have to search each and every folder for the virus. That’s why security experts/ analyst suggest to use automatic removal tool because in manual process you have to waist your precious time whether you could leave this job on anti-malware tool which can search each and every folder on the PC in few minutes. Otherwise, if you still want to use manual process and take risk then below is the guide to delete Ads by Media Buzz from your Infected Computer, go through it and root-out the threat from the PC.
How to start Computer in “Safe Mode”:
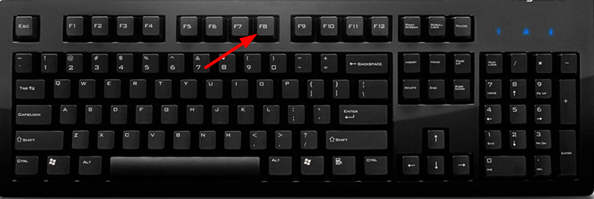
First of all you have to “Restart” your System.
During Booting victim/user have to “press F8” repeatedly.
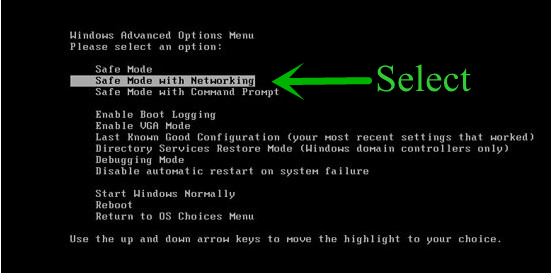
After that you will get some option to choose like “Safe Mode”, “Safe Mode with Networking”, and “Safe Mode with command prompt”. You have to Choose “Safe mode with Networking”.
When you System booted in Safe Mode you have to open Task manager to kill all the unwanted process running by Ads by Media Buzz:
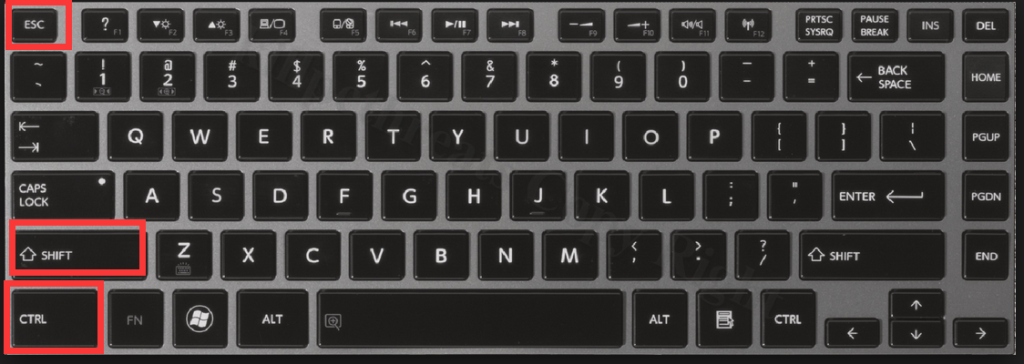
For opening “Task Manager” users have to press together “Ctrl+Shift+Esc”.
Find out unwanted process or application on which you have doubt or related with Ads by Media Buzz.
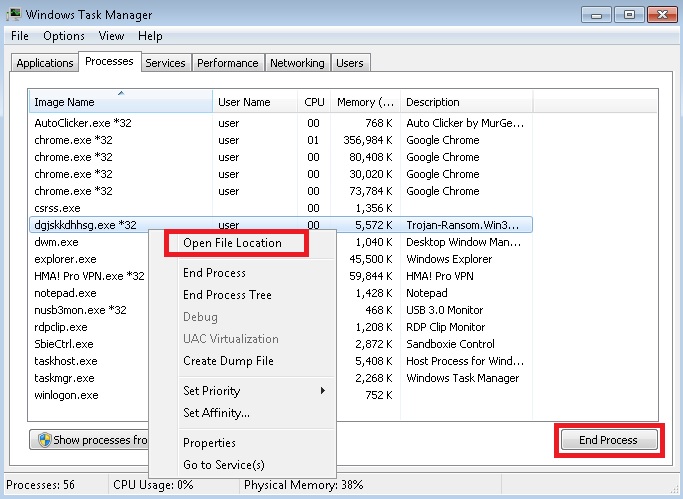
- After finding malevolent programs click on [End Process].
- You can also note down process location so you could delete it easily. For this you have to make right click on the following process and then click on “Open File Location” after this note down location.
- Now you have to Open [Run] command for this click together “Windows logo + R” and then type the following location of the Ads by Media Buzz in “Run” command and delete it permanently.
It is very important to delete Ads by Media Buzz or other unwanted files from Windows OS:
For eliminating Ads by Media Buzz from Windows vista, XP, 7, 8 or 8.1 follow below given guide.
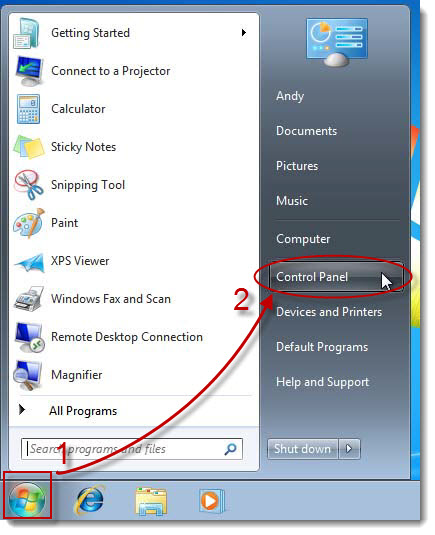
First of all you have to click on “Windows Start” button which is different in different versions but you can easily find it.
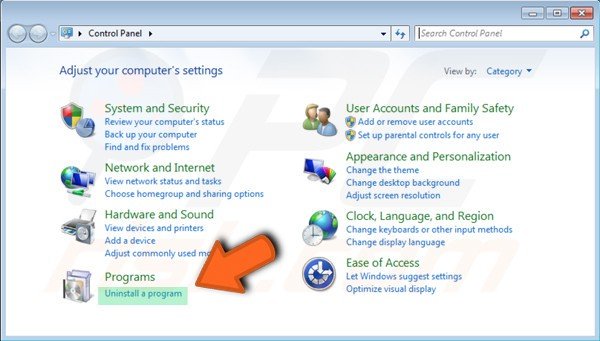
After clicking on “Windows START” button, you have to find “Control Panel”. you could search about it.
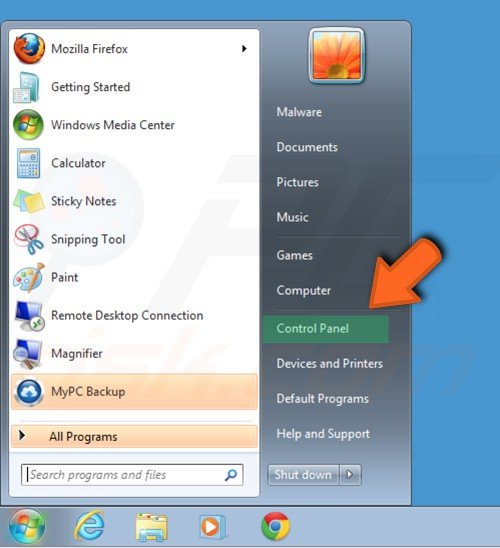
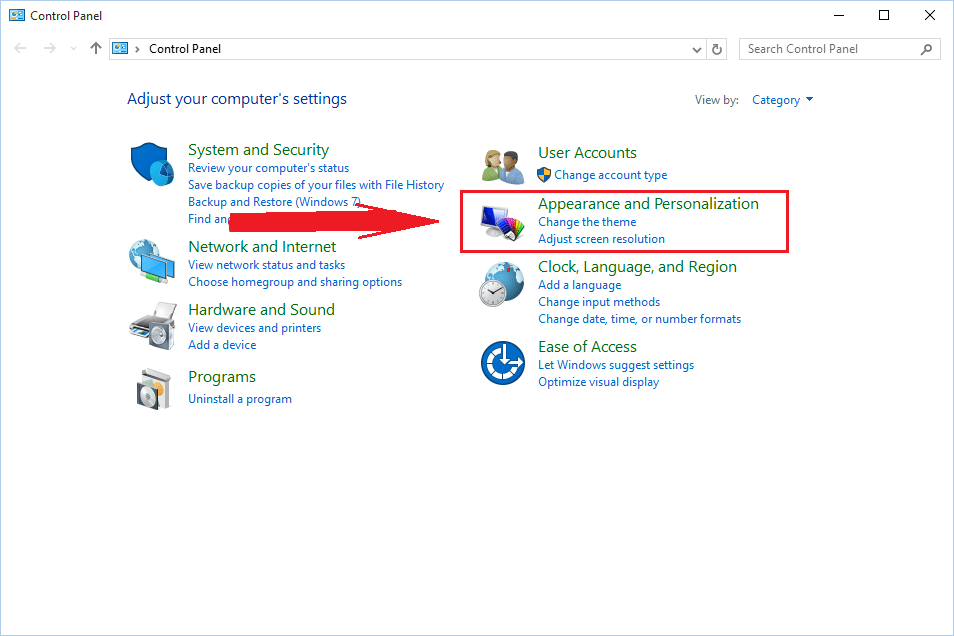
When you are inside “Control Panel” you will get lots of Option there you have to find “Programs and features” and click on it.
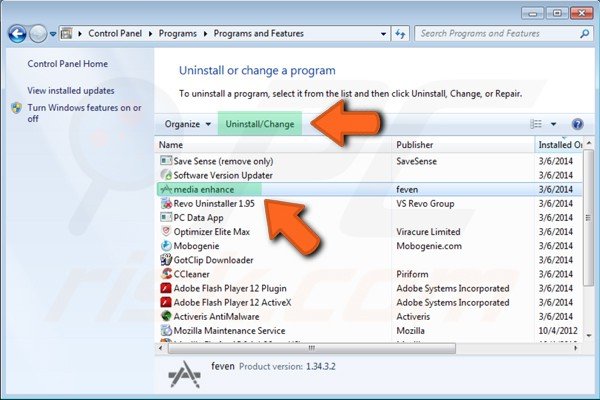
And now you have to find unknown programs or Ads by Media Buzz. then select the item and click on “Uninstall/Change”.
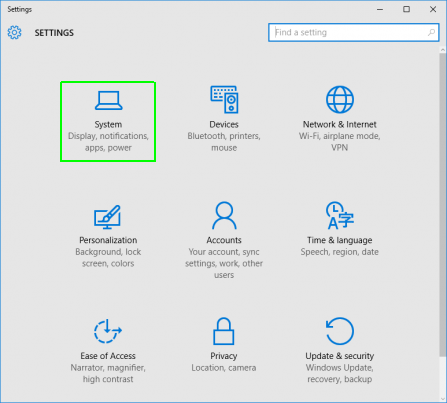
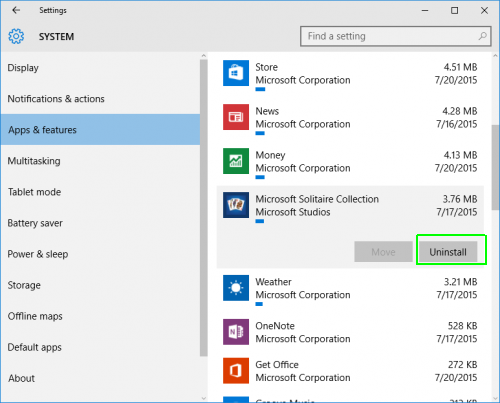
But if you are using “Windows 10” then there is some another way to delete Ads by Media Buzz:
First of all click on Windows “START” button and then search “Settings”.

When you are in “Settings” click on “System”.
In System find “Apps and Features” and click on it.
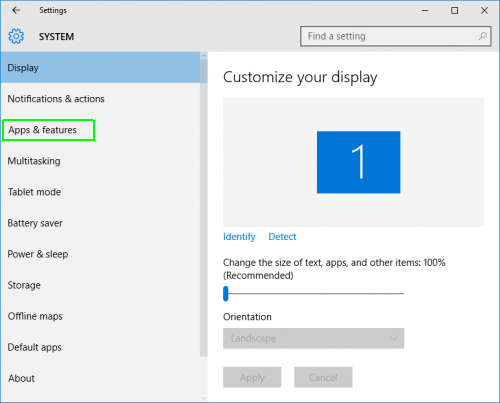
In the “Apps and Features” you have to find all the malicious items and Ads by Media Buzz then click on “Uninstall”.
now the malicious application is deleted from the System.
All the malware threats or Ads by Media Buzz has ability to change your DNS address to redirect your search keywords to its sponsored website:
For secure browsing you have to block all the redirection and for this follow the guide.
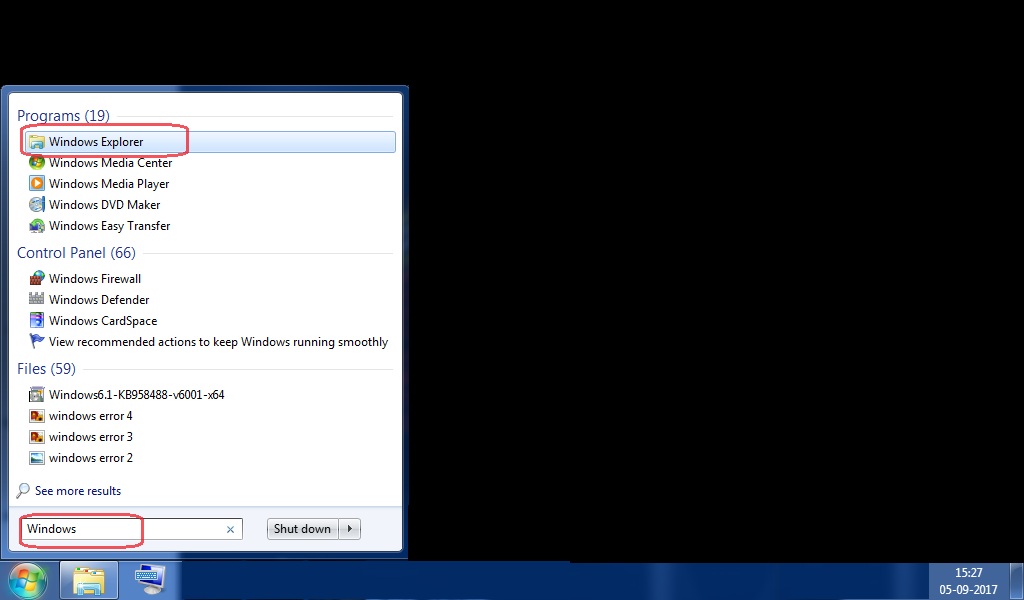
First of all open Windows Explorer.
After this in C:// drive select System32/drivers/etc/Host
If your System is infected by Ads by Media Buzz or other malware then it adds lots of unwanted IP address in this section.
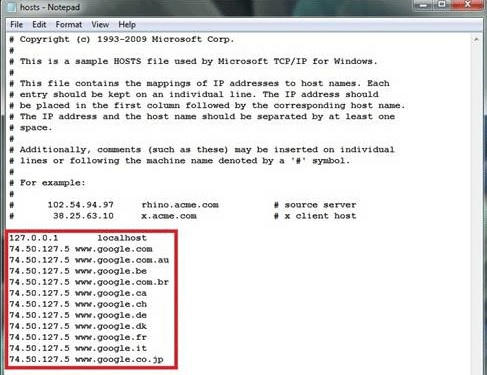
After that you have to delete all the unwanted IP addresses but don’t delete the local host entries.
When you deleted all the Unwanted IP address save the file and exit the Windows Explorer.
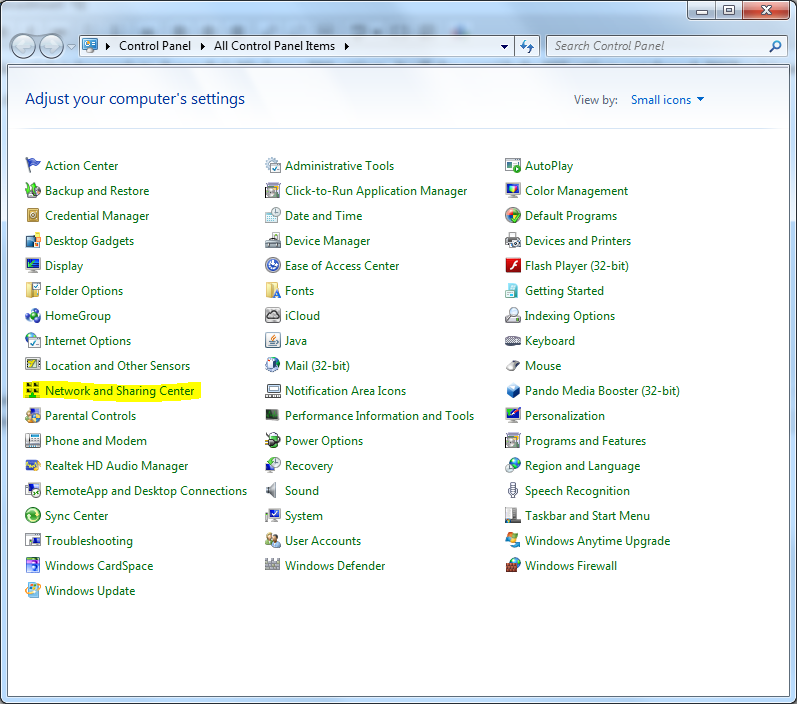
After cleaning Host file now you can easily Reset your DNS settings:
To Reset DNS settings you have to go to the “Control Panel”;
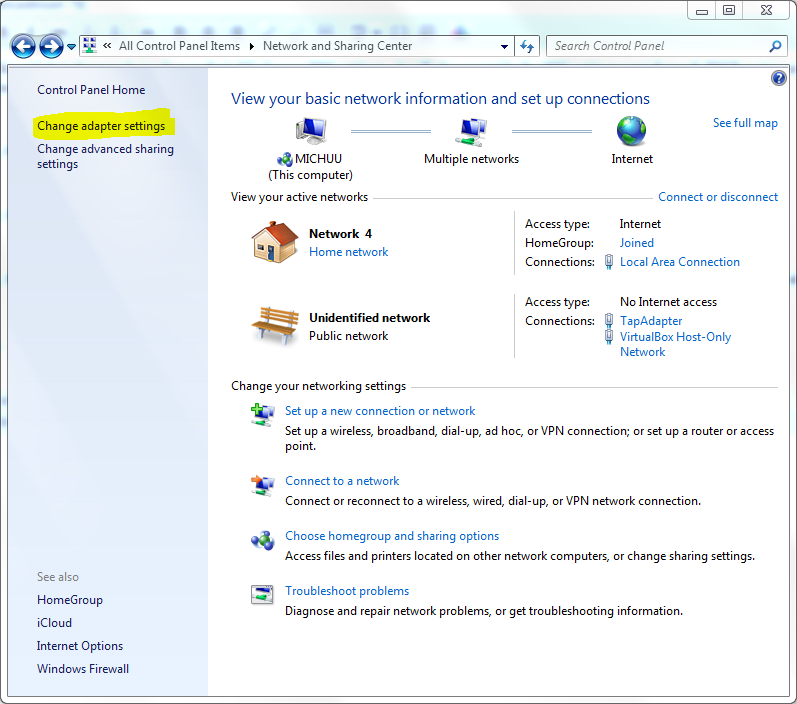
Once you are in “Control Panel” then find “Network and Sharing Center” or “Network Option”.
Inside “Network and Sharing Center” you have to find “Change Adapter Settings” (you will find it in left side bar).
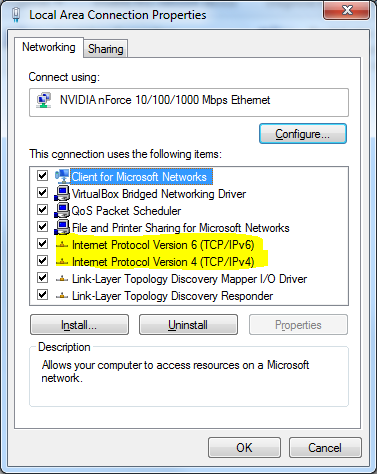
In the “Adapter Settings” you will get all the network connected with your device. Make “Right Click” on your “Network Device Name” and select “Properties”.

Once you are in “Properties” then select the “IP version” for DNS and then click on “Properties” again.
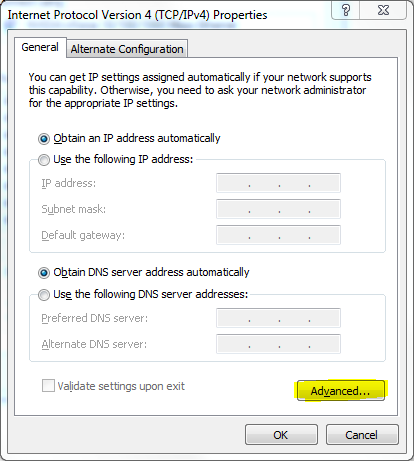
After clicking on “Properties” a Window pop-up in that Window you have to click on “Advanced” option.
In the “Advanced” section you will find DNS in top tabs click on it.

In the “DNS” section you have to click on Add option and then type “Tier2 server IP” and click Add again.
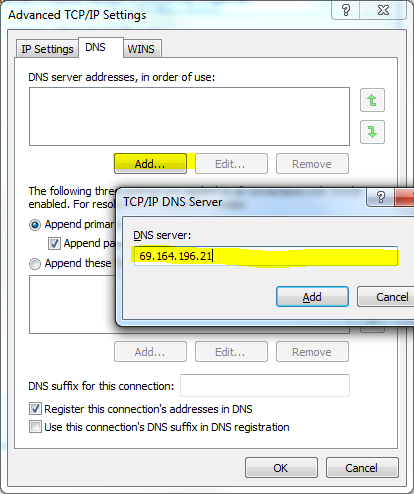
For more details about “Tier2 Server IP” you can freely visit to [ https://www.opennicproject.org/nearest-servers/]. On this website you will get all information about IP addresses.
“For your goodness we like to inform that, only use these steps if you have knowledge about it otherwise you will corrupt the System files and you will lose your hand from your System. Instead of wasting your precious time use Anti-malware program which secure your PC and save time.”
When your Computer gets infected by any malware threat like Ads by Media Buzz, it creates fake registry entries and lots more.
How to delete fake registry entries from infected System:
To securely delete fake registry created by Ads by Media Buzz first users have to delete hidden files of Ads by Media Buzz:
For applying this you have to Open “Control Panel”.
In the “Control Panel” section you have to click on “Appearance and personalization”.
In the “Appearance and Personalization” find “Folder Option” click on it. After this a Window will pop-up in this window click on “View” Tab.
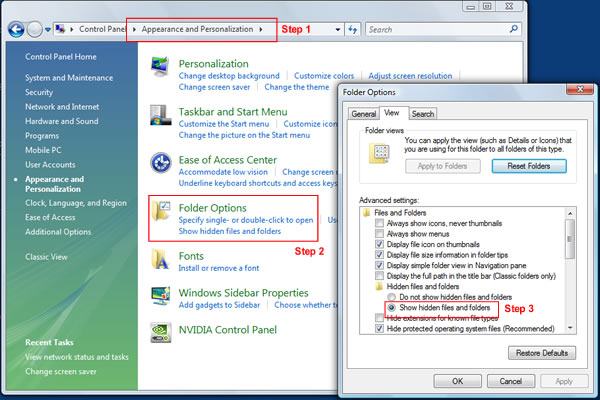
- Select the “Show hidden files and folders” option it will help show you all hidden files and folders available in System.
- Now to check all the hidden files go to the following files [C:\Users\user name\AppData\Local\Temp].
- Delete all the available files and folders in the Temp folder. (it will may be ask Administrator permission then simply click on “Continue”.)
Now we ready to remove registry created by Ads by Media Buzz from System:
To Open registry editor first you have to open “RUN” command, for this click together “Windows logo + R” button.

In the “RUN” you have to type “regedit” or “%regedit%” this open Windows Registry Editor
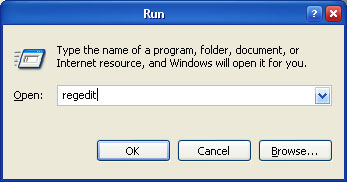
Just after typing “regedit” a new Window will open named as Windows Registry Editor
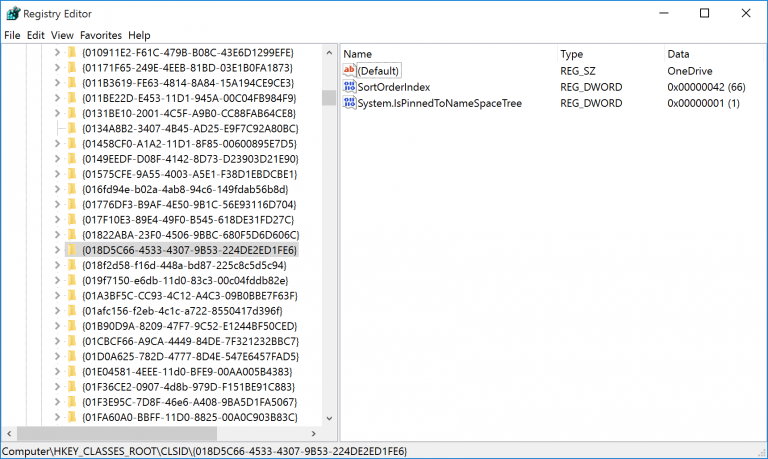
Victims have to open each and every box and delete Ads by Media Buzz or related registry entries from there.
Here are some common registry files infected by Ads by Media Buzz:
[HKEY_CURRENT_USER\Software\Microsoft\Windows\CurrentVersion\Explorer\Shell Folders]
Startup=”C:\windows\start menu\programs\startup”
[HKEY_CURRENT_USER\Software\Microsoft\Windows\CurrentVersion\Explorer\User Shell Folders]
Startup=”C:\windows\start menu\programs\startup”
[HKEY_LOCAL_MACHINE\Software\Microsoft\Windows\CurrentVersion\explorer\User Shell Folders]
“Common Startup”=”C:\windows\start menu\programs\startup”
[HKEY_LOCAL_MACHINE\Software\Microsoft\Windows\CurrentVersion\explorer\Shell Folders]
“Common Startup”=”C:\windows\start menu\programs\startup”
HKEY_LOCAL_MACHINE\Software\Microsoft\Windows\CurrentVersion\RunServices]
“Whatever”=”c:\runfolder\[Malware].exe“
[HKEY_LOCAL_MACHINE\Software\Microsoft\Windows\CurrentVersion\RunServicesOnce]
“Whatever”=”c:\runfolder\[Malware].exe“
[HKEY_LOCAL_MACHINE\Software\Microsoft\Windows\CurrentVersion\Run]
“Whatever”=”c:\runfolder\[Malware].exe“
[HKEY_LOCAL_MACHINE\Software\Microsoft\Windows\CurrentVersion\RunOnce]
“Whatever”=”c:\runfolder\[Malware].exe“
[HKEY_CURRENT_USER\Software\Microsoft\Windows\CurrentVersion\Run]
“Whatever”=”c:\runfolder\[Malware].exe“
[HKEY_CURRENT_USER\Software\Microsoft\Windows\CurrentVersion\RunOnce]
“Whatever”=”c:\runfolder\[Malware].exe“
[HKEY_CURRENT_USER\Software\Microsoft\Windows\CurrentVersion\RunServices]
“Whatever”=”c:\runfolder\[Malware].exe“
[HKEY_CLASSES_ROOT\exefile\shell\open\command] @=”\”%1\” %*”
[HKEY_CLASSES_ROOT\comfile\shell\open\command] @=”\”%1\” %*”
[HKEY_CLASSES_ROOT\batfile\shell\open\command] @=”\”%1\” %*”
[HKEY_CLASSES_ROOT\htafile\Shell\Open\Command] @=”\”%1\” %*”
[HKEY_CLASSES_ROOT\piffile\shell\open\command] @=”\”%1\” %*”
[HKEY_LOCAL_MACHINE\Software\CLASSES\batfile\shell\open\command] @=”\”%1\” %*”
[HKEY_LOCAL_MACHINE\Software\CLASSES\comfile\shell\open\command] @=”\”%1\” %*”
[HKEY_LOCAL_MACHINE\Software\CLASSES\exefile\shell\open\command] @=”\”%1\” %*”
[HKEY_LOCAL_MACHINE\Software\CLASSES\htafile\Shell\Open\Command] @=”\”%1\” %*”
[HKEY_LOCAL_MACHINE\Software\CLASSES\piffile\shell\open\command] @=”\”%1\” %*”
Computer/PC Experts guide to secure PC from Ads by Media Buzz:
All things considered, the single greatest factor in keeping a danger like Ads by Media Buzz disease is lies upon you. Indeed, even you as of now introduce Anti-Malware and you check your Computer convenient, on the off chance that you don’t be deliberately towards your PC while utilizing it. It is clearly to get infected by Ads by Media Buzz once more. Along these lines, you simply require carefulness to abstain from being influenced by risk in future and n a few hints and recommendation specify here will ideally keep your Computer from contamination in coming time.
- Keep your anti-malware updated.
- Utilize solid passwords for significant data to keep from hacking.
- Incapacitate auto-run capacities for downloaded documents and infused drives.
- Square auto update from organize inside System.
- Forget it obscure beneficiary email connections.
- Abstain from interfacing with open source organize like Wi-Fi.
- Utilize equipment based firewall so as to secure your System against contamination.
- Send DNS insurance from naturally get altered.
- Utilize advertisement blocker extension and programming keeping in mind the end goal to surf without getting any extra business promotions and garbage notices.
- Try not to utilize any Un-trusted or informal area for surfing and downloading records inside browser.
Thank You for Visiting our Website, We hope You got your Solution.
For any other information or suggestion Feel free to Contact Us.